
Table of contents
- Key Electrical Terms to Understand for Solar Panel Wiring
- Basic Concepts of Solar Panel Wiring (aka Stringing)
- Information You Need When Determining How to String Solar Panels
- Basic Rules for How to String Solar Panels
- Exploring Other Options
- Key Takeaways
Solar panel wiring (also known as stringing), and how to wire solar panels together, is a fundamental topic for any solar installer. It’s important to understand how different stringing configurations impact the voltage, current, and power of a solar array so you can select an appropriate inverter for the array and make sure that the system will function effectively.
The stakes are high. If the voltage of your array exceeds the inverter’s maximum, production will be limited by what the inverter can output (and depending on the extent, the inverter’s lifetime may be reduced). If the array voltage is too low for the inverter you’ve chosen, the system will also underproduce because the inverter will not operate until its “start voltage” has been reached. This can also happen if you fail to account for how the shade will affect system voltage throughout the day.
Thankfully, modern solar software can manage this complexity for you. For example, Aurora’s auto-stringing functionality in Sales Mode will seamlessly and effortlessly add string inverters automatically in under 10 seconds. Watch the video below to learn more.
However, as a solar professional, it’s still important to have an understanding of the rules that guide string sizing. Solar panel wiring is a complicated topic and we won’t delve into all of the details in this article, but whether you’re new to the industry and just learning the principles of solar design, or looking for a refresher, we hope this primer provides a helpful overview of some of the key concepts.
In this article, we’ll review the basic principles of wiring systems with a string inverter and how to determine how many solar panels to have in a string. We also review different stringing options such as connecting solar panels in series and connecting solar panels in parallel.
Key electrical terms for solar panel wiring
In order to understand the rules of solar panel wiring, it is necessary to understand a few key electrical terms — particularly voltage, current, and power — and how they relate to each other.
To understand these concepts, a helpful analogy is to think of electricity like water in a tank. To expand the analogy, having a higher water level is like having a higher voltage — there is more potential for something to happen (current or water flow), as illustrated below.
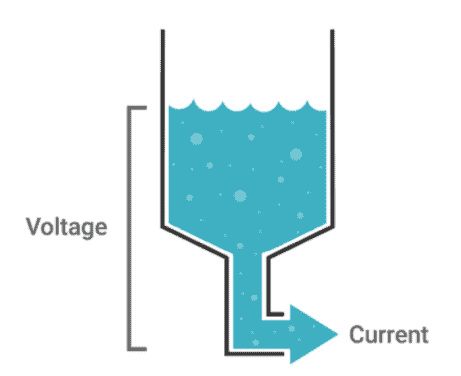
What is voltage?
Voltage, abbreviated as V and measured in volts, is defined as the difference in electrical charge between two points in a circuit. It is this difference in charge that causes electricity to flow. Voltage is a measure of potential energy, or the potential amount of energy that can be released.
In a solar array, the voltage is affected by a number of factors. First is the amount of sunlight (irradiance) on the array. As you might assume, the more irradiance on the panels, the higher the voltage will be.
Temperature also affects voltage. As the temperature increases, it reduces the amount of energy a panel produces (see our article on Temperature Coefficients for a more detailed discussion of this). On a cold sunny day, the voltage of a solar array may be much higher than normal, while on a very hot day, the voltage may be significantly reduced.
What is an electrical current?
Electric current (represented as “I” in equations) is defined as the rate at which the charge is flowing.
In our example above, the water flowing through the pipe out of the tank is comparable to the current in an electrical circuit. Electric current is measured in amps (short for amperes).
What is electric power?
Power (P) is the rate at which energy is transferred. It is equivalent to voltage times current (V*I = P) and is measured in Watts (W). In solar PV systems, an important function of the inverter — in addition to converting DC power from the solar array to AC power for use in the home and on the grid — is to maximize the power output of the array by varying the current and voltage.
For a more technical explanation of how current, voltage, and power interact within the context of a solar PV system, check out our article on Maximum Power Point Tracking (MPPT).
In it, we discuss current-voltage (IV) curves (charts that show how the panel output current varies with panel output voltage), and power-voltage curves (which show how panel output power varies with panel output voltage). These curves offer insight into the voltage and current combination(s) at which power output is maximized.

Basic concepts of solar panel wiring (aka stringing)
To have a functional solar PV system, you need to wire the panels together to create an electrical circuit through which current will flow, and you also need to wire the panels to the inverter that will convert the DC power produced by the panels to AC power that can be used in your home and sent to the grid. In the solar industry. This is typically referred to as “stringing” and each series of panels connected together is referred to as a string.
In this article, we’ll be focusing on string inverter (as opposed to microinverters). Each string inverter has a range of voltages at which it can operate.
What wiring is needed for solar panels?
When wiring solar panels, there are very specific types of cables and connectors that you’ll need to get the job done successfully. These include:
- PV Wire or Solar Cable: These are used to interconnect the solar panels which we have also referred to as stringing.
- MC4 Connectors: These connectors are standard when it comes to solar panel installation
- Wire Management Clips or Zip Ties: In order to keep wires secure and safe from potential damage, wire management clips and zip ties are typically used.
- Circuit Breakers or Fuses: These are used to provide overcurrent protection. The exact size and type depends on your system’s components and voltage.
- Charge Controller and Inverter Cables: These cables are necessary to connect the charge controller to the battery.
It’s important to remember the types and size of wires needed depend heavily on the specific design of your system. Always refer to the system specifications or consult with a solar installation professional for the best results.
Series vs. parallel stringing
There are multiple ways to approach solar panel wiring. One of the key differences to understand is stringing solar panels in series versus stringing solar panels in parallel. These different stringing configurations have different effects on the electrical current and voltage in the circuit.
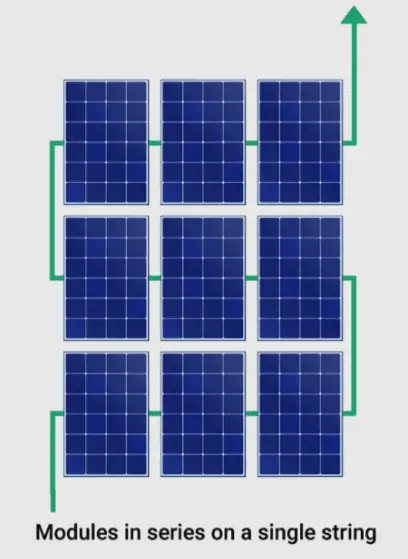
How to wire solar panels in series
Wiring solar panels in series involves connecting each panel to the next in a line (as illustrated in the diagram above).
Just like a typical battery that you may be familiar with, solar panels have positive and negative terminals. When stringing in series, the wire from the positive terminal of one solar panel is connected to the negative terminal of the next panel and so on.
When stringing panels in series, each additional panel adds to the total voltage (V) of the string but the current (I) in the string remains the same.
One drawback to stringing in series is that a shaded panel can reduce the current through the entire string. Because the current remains the same through the entire string, the current is reduced to that of the panel with the lowest current. (Note: In practice, most solar panels have bypass diodes that allow current to flow around a shaded panel.)
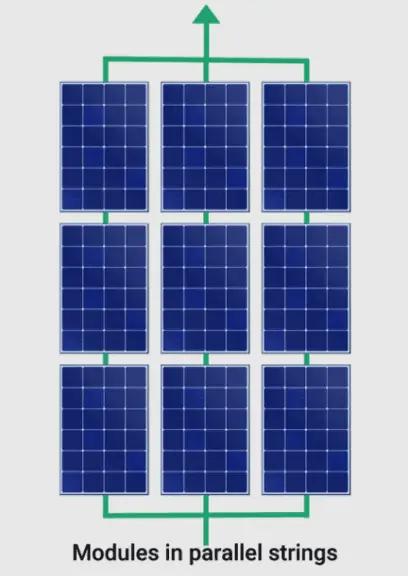
How to wire solar panels in parallel
Stringing solar panels in parallel (shown in the diagram above) is a bit more complicated. Rather than connecting the positive terminal of one panel to the negative terminal of the next, when stringing in parallel, the positive terminals of all the panels on the string are connected to one wire and the negative terminals are all connected to another wire.
When stringing panels in parallel, each additional panel increases the current (amperage) of the circuit, however, the voltage of the circuit remains the same (equivalent to the voltage of each panel). Because of this, a benefit of stringing in parallel is that if one panel is heavily shaded, the rest of the panels can operate normally and the current of the entire string will not be reduced.
Sequence of operations: Information you need when determining how to string solar panels
There are several important pieces of information about your inverter and solar panels that you need before you can determine how to string your solar array.
Inverter information
You’ll need to understand the following inverter specifications (these can be found in the manufacturer datasheet for the product):
- Maximum DC input voltage (Vinput, max): the maximum voltage the inverter can receive
- Minimum or “Start” Voltage (Vinput, min): the voltage level necessary for the inverter to operate
- Maximum Input Current: how much energy the inverter can handle before breaking
- How many Maximum Power Point Trackers (MPPTs) does it have?
What are MPPTs?
As noted above, a function of inverters is to maximize power output as the environmental conditions on the panels vary. They do this through Maximum Power Point Trackers (MPPTs) which identify the current and voltage at which power is maximized.
However, for a given MPPT, the conditions on the panels must be relatively consistent or efficiency will be reduced (for instance, differences in shade levels or the orientation of the panels).
It is also important to note that, if the inverter has multiple MPPTs then strings of panels with different conditions can be connected to a separate MPPT.
Solar panel information
In addition to the above information about your selected inverter, you’ll also need the following data on your selected panels:
- Open circuit voltage (Voc): the maximum voltage that panel can produce in its no-load condition
- Short circuit current (Isc): the current running through the cell when the voltage is at zero (although we won’t delve into current calculations in this article)
An important thing to understand about these values is that they are based on the module’s performance in what is called Standard Test Conditions (STC).
STC includes an irradiance of 1000W per square meter and 25 degrees Celsius (~77 degrees F). These specific lab conditions provide consistency in testing but the real-world conditions a PV system experiences may be very different.
As a result, the actual current and voltage of the panels may vary significantly from these values.
You’ll need to adjust your calculations based on the expected minimum and maximum temperatures where the panels will be installed to ensure that your string lengths are appropriate for the conditions the PV system will encounter, as we’ll discuss below.
Basic rules for how to wire solar panels
1. Ensure the minimum and maximum voltage are within the inverter range
Do not allow the strings you are connecting to the inverter to exceed the inverter’s maximum input voltage or maximum current, or to fall below its minimum/start voltage.
Ensure that the maximum voltage complies with code requirements in the area where you are designing.
In the U.S., the National Electrical Code caps the maximum allowable voltage at 600V for most residential systems. In Europe, higher voltages are allowed.
Pro Tip: Don’t use STC values alone to determine voltage range
We know that voltage is additive in series strings while current is additive in parallel strings. As such, you might intuitively assume that you can determine the voltage of our proposed PV system design and whether it falls within the recommended range for the inverter by multiplying the voltage of the panels by the number in a series string. You might also assume that you could determine the current of the system by adding the current of each parallel string (which would be equal to the current of the panels multiplied by the number in the parallel string).
However, as we discussed above, since STC values reflect the modules’ performance under very specific conditions, the actual voltage of the panels in real-world conditions may be quite different.
Thus the simplified calculations taken from STC values only give you an initial rough estimate; you must account for how the voltage of the system will change depending on the temperatures it may experience in the area where it is installed. At colder temperatures, the voltage of the system may be much higher; at higher temperatures, it may be much lower.
To ensure that the temperature-adjusted string voltage is within the input voltage window of the inverter it will require a more complicated formula, like the ones below:

If these equations look a bit like gibberish, don’t worry, Aurora solar design software automatically performs these calculations and alerts you as you are designing if your string lengths are too long or too short given the expected temperatures at the site. (For more information on stringing in Aurora, see this help center article.)
Aurora also performs a variety of other validations to ensure that the system will follow the proper sequence of operations for solar and not violate codes or equipment specifications — this can prevent costly performance issues.
An example of underperforming PV systems
For a real-world example of why it is so important to accurately account for how environmental conditions will impact the voltage of your PV system, read our analysis of an underperforming system in Cathedral City, California. In that case, a solar designer’s failure to account for the presence of shade resulted in the system frequently falling below the inverter’s start voltage and therefore producing significantly less energy than forecasted.
2. Ensure strings have similar conditions — or connect strings with different conditions to different MPPT ports
Once you’ve determined that your strings are acceptable lengths for the inverter specifications, another key consideration is that the strings have the same conditions (e.g. same azimuth/orientation, same tilt, same irradiance) if they are connected to the same inverter MPPT.
Mismatches in the conditions on the strings will reduce the efficiency and power output of your solar design. For a discussion of why mismatches in shading, orientation, or azimuth result in lost power output see our Guide to PV System Losses.

If you are designing for a site where it’s necessary to have panels on different roof faces, or some areas of the array will get more shade than others, you can ensure that the panels with different conditions are separated into their own strings, and then connect those strings to different MPPTs of the inverter (provided your chosen inverter has more than one MPPT).
This will allow the inverter to ensure each string operates at the point where it produces the maximum power.
3. Advanced considerations to optimize your design
The above rules will ensure that your stringing configuration will comply with the specifications of your inverter and that the energy production of the system won’t be negatively affected by mismatches in the conditions on the panels.
However, there are additional factors that a solar designer can consider to arrive at the optimal design (that is, the design that maximizes energy production while minimizing cost). These factors include inverter clipping, the use of module-level power electronics (MLPE) — devices which include microinverters and DC optimizers, and design efficiency provided by software tools.
Inverter clipping
Sometimes it may make sense to oversize the solar array that you are connecting to the inverter leading to a theoretical maximum voltage that is slightly higher than the inverter max. This may allow your system to produce more energy (because there are more panels) when it is below its maximum voltage, in exchange for reduced (“clipped”) production during the times when the DC voltage of the array exceeds the inverter’s maximum.
If the production gains exceed the production lost to inverter clipping, then you can produce more power without paying for an additional inverter or one with a higher voltage rating.
Of course, this decision should be made with care and a clear understanding of how much production will be clipped compared to how much additional production will be gained at other times.
In its system loss diagram, Aurora indicates how much energy will be lost to clipping so that you can make an informed decision about whether this makes sense. For a detailed explanation of inverter clipping and when a system with inverter clipping makes sense, see our blog article on the subject.
Microinverters
String inverters are not the only inverter option. Microinverters, which are inverters that are attached to each individual panel (or a couple), allow each panel to operate at its maximum power point regardless of the conditions on other panels. In this arrangement, one need not worry about ensuring panels on the same string have the same conditions. Microinverters can also make it easier to add more panels in the future.
Explore a few different options to find the best one
As you can see, there are many considerations when it comes to stringing your panels and finding the inverter and stringing configuration that is best for the customer.
You may not arrive at the optimal design the first time around so it can be helpful to evaluate a few different options. In order for this to be efficient, however, you’ll need a process where you can evaluate multiple designs quickly. This is where solar software, like Aurora, can be particularly valuable.
Let solar software do the stringing for you
Finally, technology like Aurora’s autostringing functionality in Sales Mode can do the stringing for you! It will take into account the considerations discussed here and present you with an ideal stringing configuration.
Schedule a quick, personalized demo to see how software can help you design your solar systems.
Key takeaways:
- You can wire solar panels in a series or parallel — which is better depends on the specific situation. In general, when there are potential shading issues, parallel is the better option.
- Don’t forget the essential info you’ll need:
- Maximum DC input voltage
- Start voltage
- Maximum input current
- Number of MPPTs
- Open circuit voltage
- Short circuit current
- We don’t recommend using basic STCs to calculate the ideal inverter range, as it can lead to underperforming systems.
- Make sure strings with similar conditions are connected to the same MPPT ports (or maintain similar conditions for all strings).
- Consider inverter clipping and microinverters as alternative options.
Understanding the principles of solar panel wiring lets you ensure optimal designs for your solar customers. To learn more about how solar works, how to size a solar system, how to mitigate shading losses, and more, check out PV Education 101: A Guide for Solar Installation Professionals.
Schedule a demo to see how software can help you design your solar systems.
FAQs
Here are a handful of quick answers to frequently asked questions about solar panel wiring basics.
What wiring is required for solar panels?
Solar panels require wiring that is protected for outdoor use and rated to handle the system’s amperage. Most modern solar panel installations use single-conductor Photovoltaic (PV) wire, between 10 and 12 gauge AWG. Wiring is required to connect the solar panels to the charge controller, inverter, and battery (in an off-grid system).
Is it better to wire solar panels in series or parallel?
In terms of power production, it is better to wire solar panels in a parallel circuit rather than a series. Parallel solar wiring allows for more independent power production between the panels but also increases the system’s upfront costs for materials and installation. To maximize electricity production without exceeding inverter voltage ratings, some solar energy systems use a combination of series and parallel wiring connections. Technology such as solar optimizers and microinverters can also help maximize system efficiency.
How many solar panels can I connect to my inverter?
The number of solar panels you can connect to your inverter is identified by its wattage rating. For example, if you have a 5,000 W inverter, you can connect approximately 5,000 watts (or 5 kW) of solar panels. Using 300 W solar panels, you could then connect roughly 17 solar panels (5000 W / 300 W per panel).
Can I connect solar panels directly to a battery?
Although the answer is technically yes, you should never connect a solar panel directly to a battery. As solar power is generated at various intensities throughout the day, charge controllers (or regulators) modify the energy so that it can be efficiently stored in the battery. Using a charge controller between the solar panels and storage bank maximizes the system’s production and protects the battery from overcharging, damages, and malfunctions.
Can I use solar panels and an inverter without a battery?
Yes, as battery technology improves, many homeowners are considering battery storage as an addition to their solar system. But, traditionally, most grid-connected solar systems didn’t have battery storage. While it is impossible to run an off-grid photovoltaic (PV) energy system without battery storage, professionally permitted and installed solar panels and inverters safely produce solar power that is distributed throughout a home and fed into the utility electrical grid.
How can solar panel be part of a whole home electrification solution?
Solar panels are an important part of whole home electrification projects. They can help reduce bills and reliance on the grid, ultimately making electrification an even better, less expensive option. Check out the free Guide to Whole Home Electrification to learn more.